Nyaupi Raspberry alarm

There has been some house burglaries attempts on my block of flats recently, so I’ve got the perfecte excuse to buy a Raspberry Pi 4 and start playing with it :)
Specifically, I wanted to install a homemade alarm on my front door of my flat so I started planning about how could I make that real.
Nyaupir means to bark in pallarese and it gives its name to this little project.
Requirements
First todo thing is define what do you want that alarm to do. So we must define its requirements:
- Detect when a door is opened
- Make some noise
- Notify outside
- Be deactivable
- High availability
Pieces
Second thing to do after you have defined the requirements is draw up a shopping list of all the parts you need to make it. Here is mine:
- Raspberry Pi 4
- Memory card
- Power connector + extension cable
- Active buzzer
- Magnetic sensor switch
- Breadbord + connection clabes
- Battery shield + battery
- Wooden board + screws
Wiring
Before starting building the system we must install an operative system to our Raspberry and connect it to the network. In my case I’ve chosen Raspberry Pi OS (32-bit) Lite (previously called Raspbian) because it officially supports GPIO.
Once our little computer is working, we can start with the wiring.
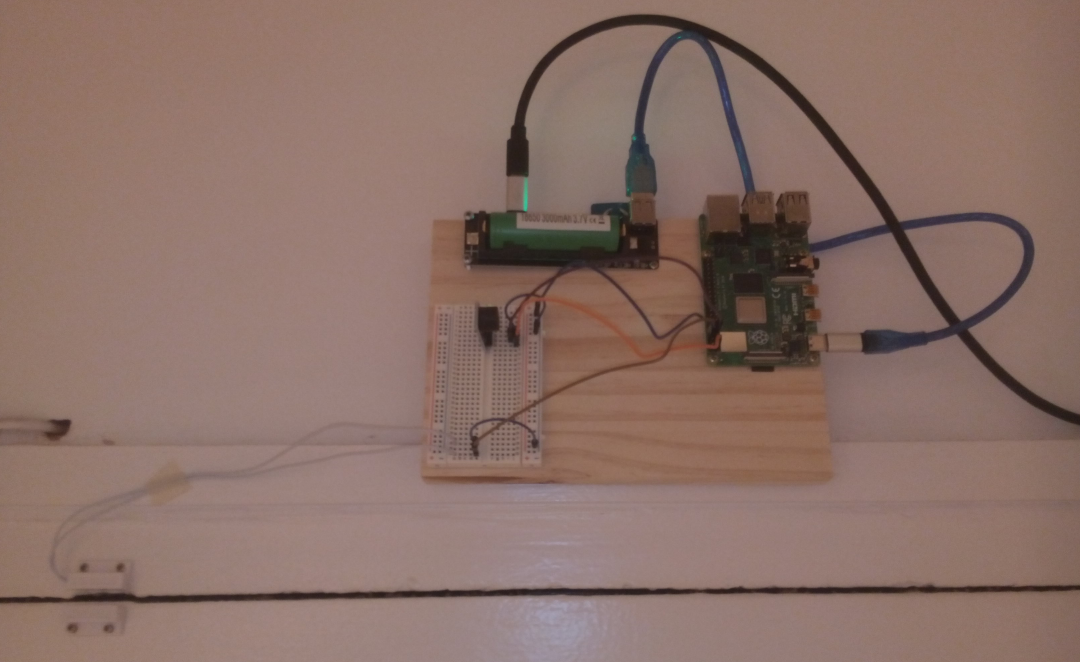
The easiest thing to do is to add the battery shield. You can simply insert the battery to the shield (check the + and - sides) and then insert it between raspberry power supply and raspberry itself. (Poweroff your raspberry before disconnecting it to prevent memory corruption!)
In my case I picked the wrong usb shield and I had to buy two micro-usb to usb-c adapters.
After battery is charged, disconnect your raspberry power supply to check the battery shield keeps raspberry working correctly.
Again, in my case battery shield doesn’t work correctly. When a power interruption occurs, battery starts giving power to raspberry but after a quick restart so unfortunately raspberry loses power for a second, which is not recommended…
Let’s connect our buzzer and door sensor! We will use a breadboard to make the wiring easy (protoboard or direct wiring is valid too).
For the door sensor, I’ve connected one leg to PIN 8 and the other to the breadboard ground (which comes from PIN 6). Then, place the wired side of the sensor switch on the door frame and the other on the door itself.
For the active buzzer, connect VCC buzzer pin to 3V3 power raspberry PIN 1, I/O buzzer pin to PIN 7 and GND buzzer pin to breadboard ground (shared again from PIN 6).
Of course, configuration doesn’t need to be exactly like that. Just be sure that you connect to correct pins (ground with ground, 3v3 with 3v3, I/O with I/O, etc) and then make the corresponding changes on code to use the chosen pins!
Code
Alarm code (check it out here) is made of some scripts, each one with an specific task:
storage.py: store and retrieve door and alarm state on an sqlite3 db.buzzer.py: beep & alarm sounds.door.py: checks door sensor state and stores it to db.mail.py: send a notification email.switch.py(not an script but a flask api): exposes on port 5000 methods/onand/offto handle alarm state, and/statusto get alarm and door state.alarm.py: the core script. Starts storage and door scripts. Then checks state changes on a loop. It has 3 functionalities. When alarm is activated beep twice. When alarm is deactivated beep once. And when door is opened and alarm active start alert sound and send notification emails.
All scripts also have a __main__ function to be tested alone. For example:
python3 buzzer.py beep times 7
will make buzzer beep seven times.
Setup
Finally, to make code work we must follow the nexts steps:
- Make raspberry LAN ip static. You can do it from the router or using raspberry DHCP client daemon (DHCPCD).
- Install docker:
sudo apt install docker.io sudo systemctl start docker sudo systemctl enable docker - Clone git repo & get into it:
git clone https://github.com/jordifierro/nyaupi-raspberry.git cd nyapi-raspberry - Some configuration has been parametrized to be easily changed:
SECRET_KEY=X                # Used later for authenticate from the client
ALARM_SOUND_MINUTES=1       # How long buzzer in case of alarm
DOOR_SENSOR_PIN=8           # Your connected pins
BUZZER_PIN=7
EMAIL_HOST=smtp.mail.io     # Set up an email server to send notifications and paste config here
EMAIL_PORT=587
EMAIL_HOST_USER=user@mail.com
EMAIL_HOST_PASSWORD=X
EMAIL_FROM=alarm@mail.com   # Define the content and receiver of the alarm notification email
EMAIL_TO=receiver1@mail.com, receiver2@mail.com
EMAIL_SUBJECT=ALARM
EMAIL_MESSAGE=Door has been opened!
Set your own params to
env.listfile:cp env.list.sample env.list - Build & run with docker:
sudo docker build -t nyaupi .
sudo docker run --privileged -p 5000:5000 --name nyaupi --restart=always -d -t nyaupi
Alarm is up & running! :)
Remote control
As said before, we have a flask application running listening on port 5000 of our raspberry private ip with endpoints to retreive alarm state and also to turn on or off the alarm. I’ve chosen Android client to make my own remote switch controller!


As simple as that. Just an screen that informs about alarm state and lets you switch it. You can view its source code here.
And that’s pretty much all! I’ve learned a lot with that project and I feel a little more secure :) I have explained all the process without a great detail… so if you want more specific information about any step don’t hesitate to comment it below! Thanks!!